Afternoons, garages and old cars
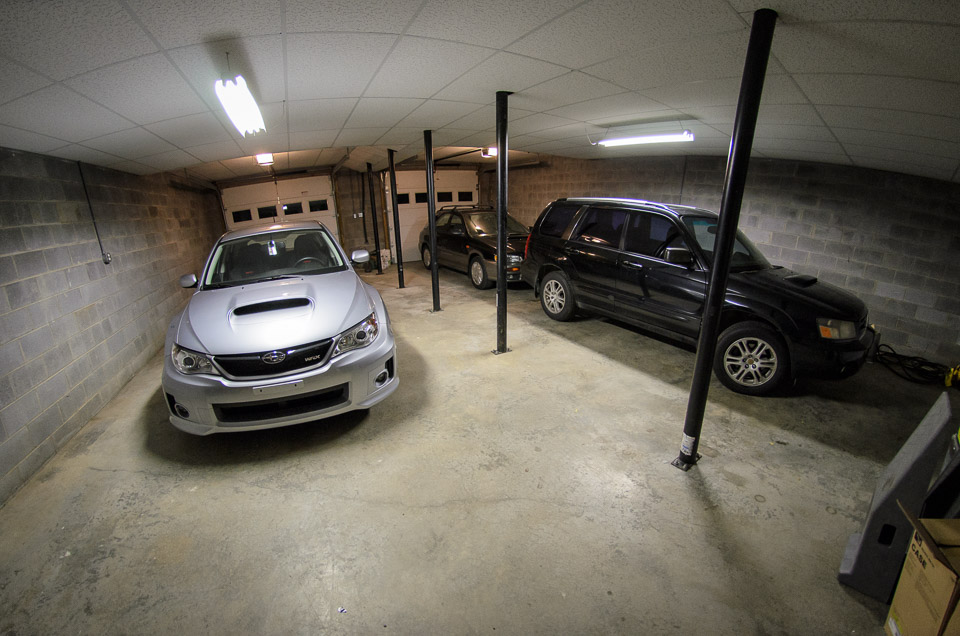
It's another Saturday afternoon. Your hands are sore, everything smells of motor oil, axle grease or ATF. It's getting close to its third decade, you've just started your forth and this three hour repair is on day number two. A mix of distrust and pride prevent you from simply taking it to a shop. You may have an understanding spouse but your friends think you've lost your mind. Questions have arisen about the financial wisdom in maintaining this vehicle or perhaps even some safety concerns.
This car, a simple means of conveyance to most, has been with you a while. Around a decade ago you began this relationship. Back then you had more ideas than money, things looked different. Retirement was something grandparents did. $300 for rent was a challenge and $300,000 for a house was unthinkable. The car took you everyday to work and class. Saw you and friends on a few trips. Eventually it drove you to a couple graduations or to a new job and your friends went their own ways. It took you and your now wife on your first date, later it drove you to your wedding. Dutifully the car moved your possessions from apartment to apartment during those first few years or marriage. Later it slogged through cold winters' days to move you into a new house.
Throughout all this change this machine remained ever constant. It's no longer just transportation but memorial of sorts. A symbol for what you once were and where you've come from.
Not only the memories but it's a connection to the way things used to be. Bluetooth? CVT? Navigation system? Nope. The 1990s weren't that long ago but things have changed. Even basic cars now are more about infotainment than driving. Digital gauges and touch screens now demand more attention than the task at hand. Huge pillars and backup cameras to compensate for the lack of visibility now standard. A truly small, light car with a clutch pedal and sense of danger is as foreign of a concept now as self driving cars were then. As Americans we claim to love driving but the evidence says otherwise.
No matter. You're different now. Progress happened. Perhaps you're a little fatter and a mortgage takes the place of that great next thing. Excitement about your potential future has been displaced somewhat by the reality of a mundane career and the realization that today is that "one day" you spent so long thinking about. Not to complain too much, you have it better than most. You have your health and the means to provide. Still, something is disconcerting about the whole situation. But not when you sit in that machine. After falling into the well worn bucket seat it's twelve years ago again. You were going to be something back then. Perhaps you still are, but this feels different. Turn the ignition and suddenly everything makes sense. The drive to do more than just get by returns.
So you lean back and start thinking about replacing those struts you've been putting off.
Photography and Privacy
Cognitive dissonance is a crazy thing. On one hand I am definitely committed to this whole photography thing. I enjoy walking around with my camera looking for nothing in particular to shoot. There are times when someone is either wearing something that catches my eye or doing something interesting and I'll stop and ask for a photo. Usually I don't do candid "surprise photo" stuff in public. I think that whole in your face street photography style has been done to death. There are times when I'll end up with people in the shot just because they're involved with the larger scene and on rare occasion I have grabbed a compelling shot without asking because that moment was just too good to pass up. When a person just happens to be in the scene they're usually small enough to be unrecognizable as in the example below. Most folks are good sports about it and the people who seem to think every guy with a camera is some sort of Jared Fogle are few and far between.
In the United States the law is pretty clear on this. According to the ACLU you have the right to photograph anything that is in plain view when on public property. This includes people, buildings, and officials. There have been some laws passed in certain locales about not photographing police officers. This also doesn't mean you can get a long lens, stand on the sidewalk and try to shoot in someone's window and on private property the property owner sets the rules. You also can't break other laws when shooting like trespassing, obstructing traffic or vandalism. You also can't take photos of someone on public property where there is a reasonable expectation of privacy, restrooms and changing rooms for example. Even if you can see into it from the outside for whatever reason. On private property the owner or people working for them cannot confiscate your camera. They can just tell you to stop or ask you to leave. Well, they can't take it from you legally but if they're threatening you with a firearm or a good beating I wouldn't argue, you can't get your camera back if you're dead. Just go get the real police if that happens.
Again, these are US laws so please don't use them for justification of public photography anywhere else. Know the laws of the places you intend to visit.
So we have a precedent for public photography being OK. Largely that has been a good thing as it lets the press do their job and allows for free expression, which was the original reasoning behind the legal justification as I understand it. Both of these are important for a world like ours to function correctly and I wholly believe in these principles.
However, most of this was put into place long before the digital age. These days a random snapshot can end up being view by people halfway across the world thanks to things like Flickr, Facebook, 500px, etc. There are also face detection algorithms which a few of these services use to automatically tag someone, along with apps that automatically upload your photos to various cloud providers. This makes for a more interesting set of problems. A photo snapped of a stranger may end up in front of all kinds of eyeballs, unlike in the past, whether deliberate or not. For most people this probably isn't much of a problem. A good part of us first worlders live our lives in public on the internet so a random photo of us walking down a street next to 5-6 Facebook albums of drunk party photos isn't that big of a deal. But there are times that someone may not want their photo plastered all over online. The common response to this is "if you're doing nothing wrong you've got nothing to hide" but it's really not that simple. There are times when people relocate to escape bad situations or other life circumstances. This doesn't mean they're up to something illegal, they could just be trying to remain hidden from an abusive or threatening person or situation. Having their photo online indicating their whereabouts may be less than optimal. These situations, while probably rare, are just a couple of examples of why someone one may not want their photos taken and posted online. Some folks may just want to live online free lives for whatever reason and that's OK too. Several decades ago during the heyday of film photography people didn't really have to worry about things like this. A photo generally didn't travel very far.
I believe that people should have a right to where they want their data stored and how much of that they want public facing. I tend to eschew many cloud services for this reason, only use Facebook/Google/etc for the most inane social interactions, disable location services on my devices, use trust no one encryption when possible and so on. Remember kids, there is no cloud, it's just other people's computers.
So I can see two sides to this argument. In a world where a photo can be seen by thousands of people in a few seconds where does the individual right to privacy end? Should a private citizen be able to ask a photographer not to take a photo or to delete it? Would that potentially be abused by public figures who may be up to no good? What about the media's ability to do its job? What about art? Do the current rules work well enough?
Personally, I'm more or less OK with how things work now. There are some fringe scenarios where everything may not work out but for the most part out in pubic and put on the Internet are close enough to the same thing. That's probably a good way to treat what you do online too. Just because you've put some disclaimer (that I'm laughing at right now) about how private and confidential that your email is doesn't mean there isn't a relay out there with it stored. Use GPG fool. Same goes for Facebook messenger, etc. But I digress.
Moreover, the press and people documenting public officials are protected somewhat by these rules. This is probably one of the most important things to keep in mind. Sure, you might not like that random guy taking photos on the street but there are others who depend on these rights and ultimately we all do to some extent. However, it is good to sit and think about these things every once in a while. Things change every once in a while these days.
Linux Photography IV: RAW Development
Note: Riley Brandt has released some video lessons on using Darktable and other open source software for photo development. I highly recommend checking them out.
Here we are getting into the good part. I've become quite fond of Darktable's RAW developer. The tools are solid and in some areas it even outstrips Lightroom's develop module.
The first thing I noticed is that Darktable doesn't come with a whole lot of modules enabled out of the box. That's easy enough to remedy though, simply expand the area labeled "more modules" and enable the modules you'd like to use. If you click through a few times it will add the module to your favorites list. I recommend enabling color correction, profiled denoise and monochrome as those have been some of my favorites thus far.
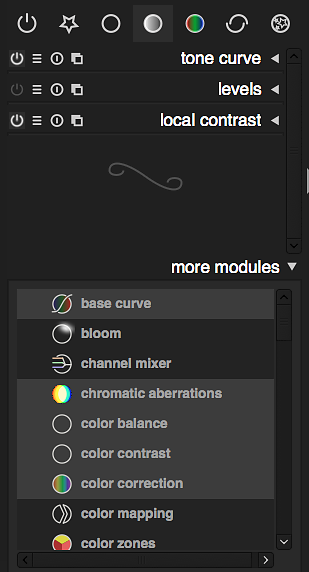
Darktable groups modules together in a few logical bins. These groups are called Active, Favorites, Basic, Tone, Color, Correction and Effects in order from left to right just below the histogram. Active is handy for disabling adjustments without digging through the other groups. The Favorites grouping contains all of the modules you've stuck in there. This is analogous to web browser bookmarks. The rest are sort of self explanatory. Things like contrast and exposure are found in the Basic group, tone curve and levels in the Tone group, color correction and input color profile in the Color group, lens corrections in the corrections group, etc. It's pretty logical once you learn your way around the interface but it does take some getting used if you're coming from Lightroom.

I'm not a huge special effects/post processing type photographer so I usually hit a few select modules and export my finished edit. Darktable does store edits in XMP files but not every other software package supports the same adjustments in the same way so it's nice to have a 16-bit TIFF of your final. My first stops are usually input color profile and base curve. Darktable supports camera ICC profiles but not DCP profiles. This posed an issue for me early on as I had been using a ColorChecker Passport and the X-rite software which only generates DCP profiles. This is fine if you're using Lightroom or Camera RAW but not much else. Apparently Argyll CMS supports the ColorChecker Passport with the correct template (which I downloaded). However I could never get it to recognize the test pattern. Not all is lost, I managed to get a working ICC profile from dcp2icc after using X-rite's software on my Mac to create the DCP profile.
Base curve is my next stop, I usually choose the preset that goes along with my camera model. Base curves take the RAW data and essentially tunes it to look good for your monitor. This is similar to the image treatments your camera does to JPEGS when you set it to Camera Standard or Camera Landscape. Darktable has a few built in base curves for each manufacturer and you can create you own as well based on JPEGs from your camera.
If the image needs some exposure tweaks I'll hit up the exposure module. This module works about the same way way as every other exposure adjustment I've ever seen in a RAW developer. Darktable's masking capability is quite good, so it's easy to just paint in adjustments over parts of the image. If no adjustments are needed I'll move on to levels, tone curve, contrast, saturation and local contrast. It's nice to have levels and curves in a RAW developer and when I do end up back in Lightroom for whatever reason I find myself missing it. Local contrast is the closest thing I've found to the clarity adjustment in Lightroom and it works OK, although it seems to highlight noise more than accentuate details. I've been primarily using the tone curve tool to adjust highlights/shadows instead of the highlights and shadows module as it seems to give better results. That's just my findings, you may like the other module better.
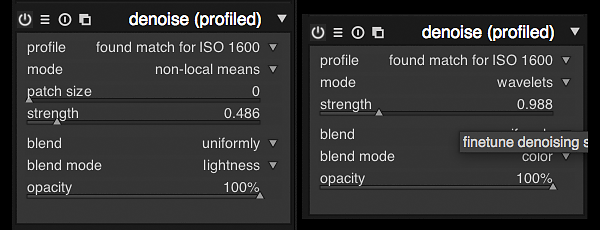
Speaking of noise, be sure to take a look at the profiled denoise plugin. It's a bit complicated looking at first but after some trail and error I've found some settings that seem to work fairly well. The wavelets mode seems to work better with color nosie and the non-local means seems to work better for chroma noise. Thankfully in Darktable can apply the same filter multiple times in multiple modes. Generally I'll duplicate the profiled denoise plugin and set one to wavelets, strength of 1 and blend it uniformly in color mode. For the other I'll set it up as non-local means, strength of 0.5 and blend it uniformly in lightness or HSV lightness mode. Those settings have worked well for me, but you may want to tweak things.
On a side note I'd also recommend looking at the color correction module. It's more of what I'd call a special effect as it's most similar to to split toning in Lightroom. But it's very useful for color grading your images. Much more customizable too.
That's about it for a quick pass through the RAW developer. This isn't intended to be a full tutorial, just a quick breeze through some of the steps I use to edit my RAWs. Next up I'll look at the GIMP and a few specialty programs out there for photo editing in the Linux world.
Linux Photography III: Organizing
Note: I have been relatively busy of late and I've been constantly revising my workflow and thus these posts. Hence the break in between updates. Still working on getting it dialed in. With Adobe's recent move towards punishing perpetual license holders I imagine alternatives will be getting some more attention.
Now we're ready to so some actual photo work. The first step in any photographic workflow is importing, organizing and tagging. Personally, I prefer to keep my photos organized on the filesystem in lieu of using any sort of albums or collection features of a particular software. This is for a couple of reasons but the main one is to remain independent of whatever development package I'm using. If Aperture and iPhoto have taught us anything it's that these things are moving targets and it's probably not wise to bolt yourself down to any particular application. Most operating systems and desktop environments support meta data in some fashion so in a lot of ways the organizing side of a lot of these applications is a bit redundant now. Mostly Lightroom, Aperture, Darktable, etc just add a GUI that's better suited to managing photos than the file manager built into your OS.
The next little bit is going to be pretty OS independent. It's also my personal way of doing things. This might not work for you or it might not make any sense. That's fine. I organize my photos into directories based upon a few criteria. Mainly I separate them out by either what type of job they were, if they were part of a series or a project or just random day to day snapshots. For example I'll have a Photos directory with sub-directories called 000_Projects, 001_Screenshots, 002_Clients, 003_Models_and_Tests, 004_Photos_by_Year. Inside of those directories I'd have directories named after the clients, job, date, or other criteria. From there I just copy the files over like any other document. After all RAWs and JPEGs aren't any different than other types of files.
Some people like to rename files off the camera, I don't do that. I worked with other photographers on jobs or as a second shooter so I have my camera doing it's own custom naming with my initials (eg LGH_XXXX.NEF). I generally don't use something like Photo Mechanic or Rapid Photo Downloader to cull or backup my files either as I'm generally set into my current workflow. However do recommend giving Rapid Photo Downloader a shot if that's your thing. My shooting style is more deliberate instead of spray and pray so generally don't have many photos to throw out when I get back to my desktop. However, I've used Lightroom for this purpose and continue to use Darktable to cull. Again, this may not be ideal if you generate a ton of images per assignment/vacation/outing/whatever. For whatever reason I like to shoot like I still have a roll of film in my camera and I don't fill up cards.
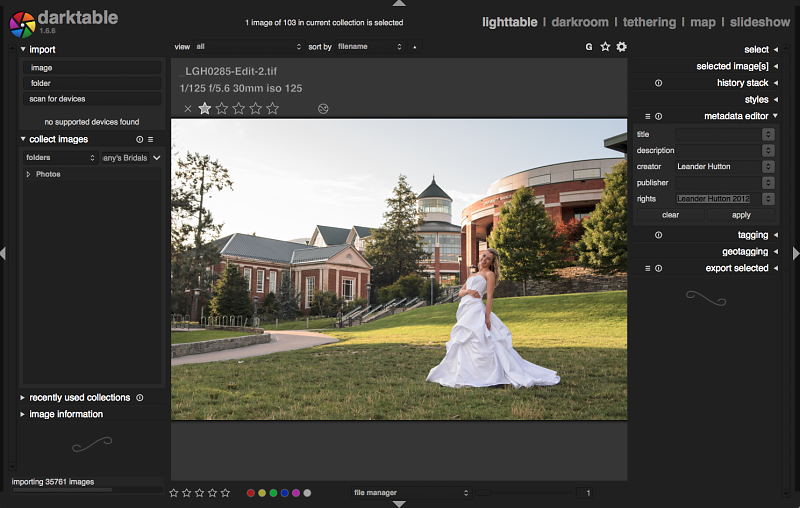
My next step involves tagging the images and applying meta data. In the case of RAW files Darktable write this information out into an XMP side car file. Lightroom will do the same thing, but you have to turn on that option. I prefer this to storing the metadata in a monolithic library as it's more portable. Darktable has pretty rudimentary metadata editing support but it gets the job done. The presentation could be a little more polished in my opinion and support for a few other fields added. Hopefully more refinements come in future versions. The lighttable module is probably the weakest point of the software right now, but it's still very usable and highly customizable.
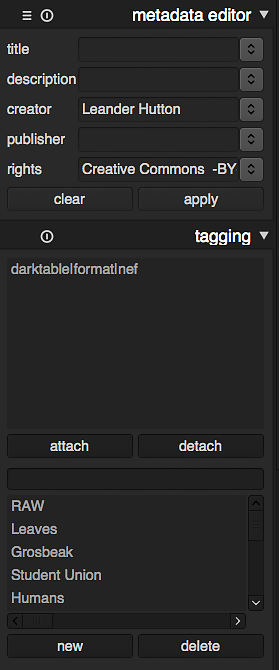
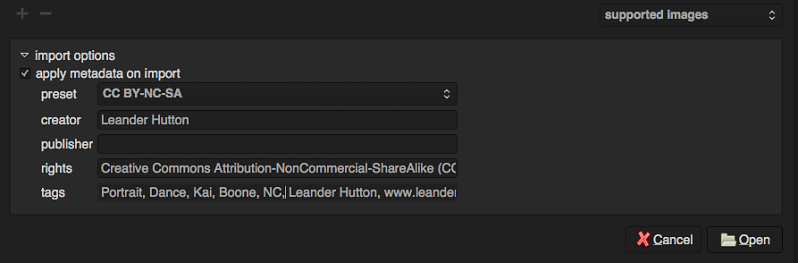
Darktable has a few presets for metadata. I started by using one of the Creative Commons options, fill in my name for the creator, and import from there. In the metadata panel you can customize the defaults and create your own presets if one of the defaults doesn't cover you. Unfortunately Darktable does not seem to support the full IPTC Creator fields as of the writing of this post. At least I haven't found anywhere to editing things like the address, phone number and site address fields. However, I simply put my contact info in the tags including my website. Not so much for preventing infringement as for directing people to my site from images they find on places like 500px and Flickr that display the tags. Other than that I don't go crazy with tags. It's definitely one of those less-is-more things. I limit it to 10-15, usually including the subject, name of the client, location, etc. All of this works just like that other commercial product everyone else uses.
Hopefully that was helpful and not too rambling. I keep updating and revising this workflow as I go so it's taken a while to get this all written down. Next up I'll dive into RAW development. That will be more about Darktable and not necessarily specific to Linux as well.
Linux Photography II: Profiling and Calibrating
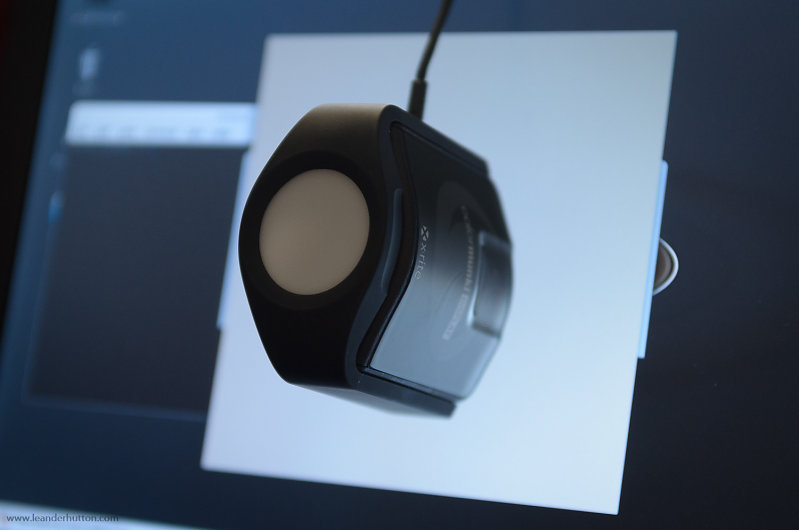
Perhaps the most important part of any graphic workflow is color management. A colorimeter should be up there with a camera and a lens on your list with of equipment to buy. Without one there's just no way to ensure reproducibility of your photos. Colorimeters are relatively cheap nowadays and even the basic ones are more than enough for discerning photographers. If you don't have one I recommend going and picking up the ColorMunki or ColorMunki Display right now. These are great inexpensive colorimeters that work well and last many years. My ColorMunki Display works fine with Xubuntu 14.04 and I imagine most USB colorimeters would.
Once you have the hardware you'll need the software. On Ubuntu based distributions this is very easy. Somewhere between falling off a log and screwing in a lightbulb. You can either used the built in display calibration tool in regular Ubuntu or install dispCalGUI via the Software Center or web download for Kubuntu or Xubuntu. If you are using one of the Ubuntu derivatives as I am you'll need to install whatever bridge you need for the desktop environment and colord if it doesn't have it by default. For Xubuntu and XFCE that's xiccd. Again not terribly hard. This is so the resulting profiles can be loaded by XFCE/Unity/KDE/etc. In standard Ubuntu you won't even have to do that much if you use the built in tools, however I recommend trying out dispCalGUI anyway as it supports more features of the colorimeter's hardware, such as ambient light detection.
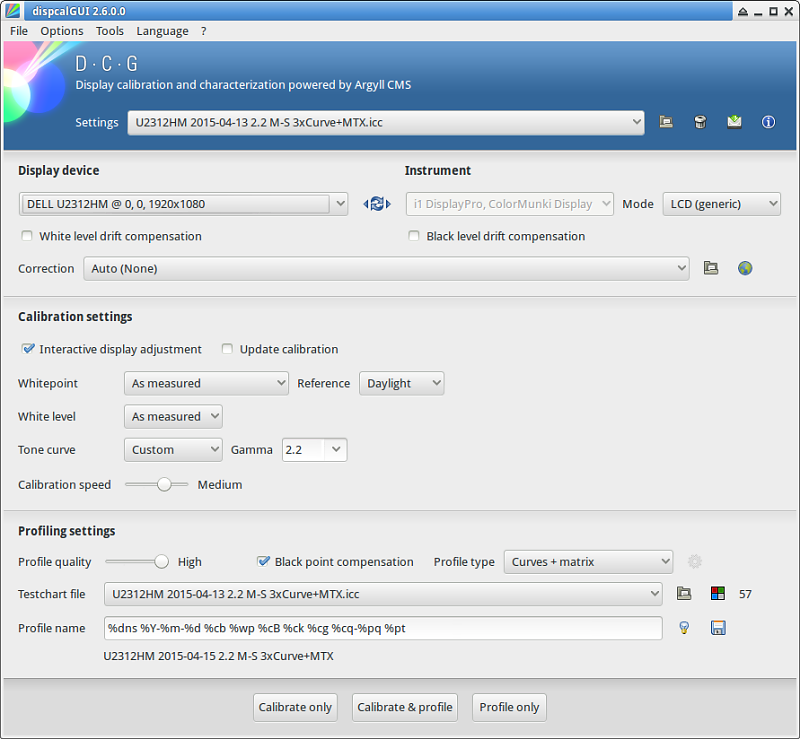
As far as I can tell there's no calibration reminders in dispCalGUI like the X-rite software. I may have missed it somewhere though. I just put a reminder in my calendar to overcome that problem.
All in all display calibration is pretty simple in Linux. If you can do it on Windows or OS X you can do it on a modern Linux distribution. The whole process is about as hand-holdy as it gets.
Next up I'll go over organizing, tagging and metadata handling.
Linux Photography I: The Great Experiment
Let me preface this by saying I've used Macs since the System 6/7 days when I was in middle school. I've also owned/built PCs during that time. I'm a general technology kind of person. I've used both platforms for almost every task imaginable. Even with that OS X has remained my platform of choice for important work over the last fifteen or so years. Both photographic and otherwise. So keep that in mind before you get your drawers in a bunch and fire off an angry email about me being a Mac hater or not hip enough to get it. I was writing code on a Mac back before the rest of the world figured out the Apple was cool and Steve Jobs knew what he was doing. I remember treating my Titanium PowerBook with the utmost care so I didn't ding the paint. I used Macs before the iPod was even a thing. I remember organizing and editing photos before Lightroom existed. So get off my lawn you darn kids!
OK, with that out of the way we can get to the meat of the post.
A few months ago I started looking at a replacing my aging Mac Pro. The final straw came when 20 of my 24GB of RAM failed and one of the RAID disk went out. Old, slow CPUs and a lack of memory really hampered my work. I RMA'ed the RAM but that would take a while to come back, FB-DIMMs were expensive when they were actually being mass produced and have only gone up in price in recent years. Ordering more RAM to hold me over seemed to be throwing good money after bad at this point.
I don't really care for the new iMacs. Part of the reason I've held on to this Mac Pro so long is because it uses easily replaceable and upgradeable parts which greatly extends it's service life. I've added a USB 3 card, upgraded the graphics to support three monitors, added more RAM, and more drives over the years. These days you can't even replace the hard drive on an iMac with off-the-shelf components due to the specialty firmware Apple uses. The new Mac Pro tube is firmly out of my budget (thanks, homeownership) and really isn't that great of a deal right now due to the hardware being aged. However, if I had an infinite budget I'd probably get 6-core model with 32-64GB of RAM, a few 1440p 27” anti-glare displays and a USB 3 or Thunderbolt disk array and call it a day. But that wasn't happening.
I looked at what kind of Mac I could get with my budget. It basically came down to a 21.5” iMac with an i5 or an i7 and 8-16GB of RAM. Not exactly appealing coming from the beast that is a Mac Pro. That felt like a real step down, even given the age of my machine.
The same amount of money would get me a killer DIY PC however.
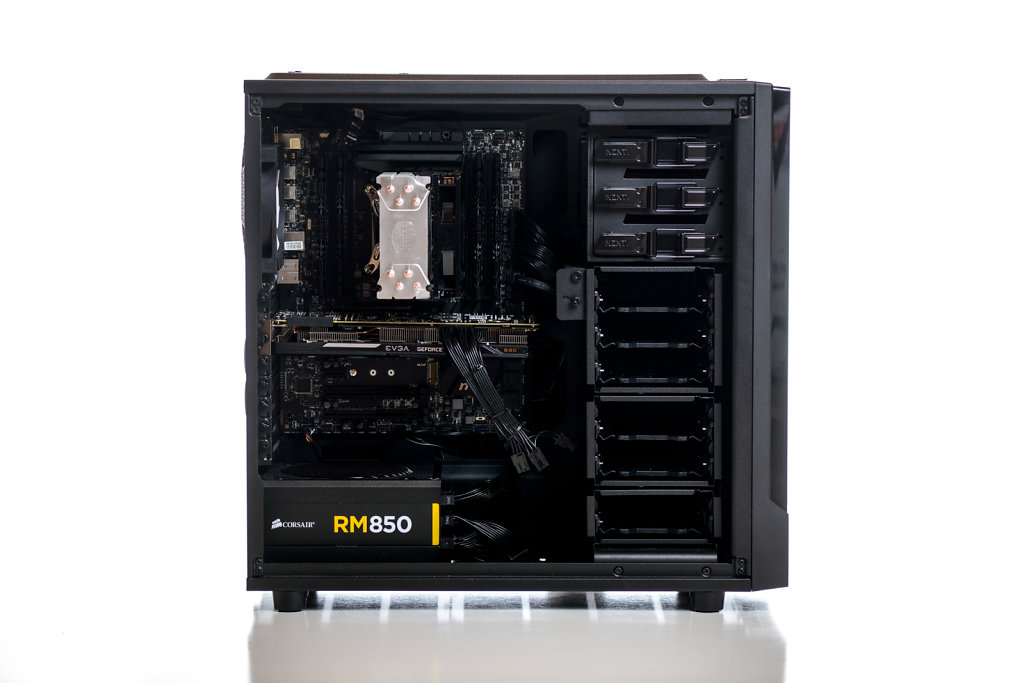
Now, in defense of the Mac option if most of your work is Lightroom and basic photo editing even the cheapest Core i5 iMac with 8GB of RAM is enough. Heck, a basic Mac Mini would probably be enough. Especially if you have a smaller resolution sensor or older camera. I do more than basic photography with my machine. Stacking for astroimaging or panorama stitching with a high resolution camera eats up RAM and CPU time. I'd like to move into 4K video at some point in the near future too, as well as some rendering, and yes, even some gaming.
That doesn't explain the choice of Linux as the OS. That's simply a matter of personal preference. The philosophies of using open source aside I have a few other projects that are simply easier to work with on a *nix based OS. I'm also not a fan of Windows 8.1's interface or of the software as a service path Adobe is taking as I was an every-other-version-at-most upgrader of CS. I don't use Photoshop enough to justify the monthly price tag and didn't want to wait around for Lightroom to head that direction. I mostly used Photoshop for panorama stitching, HDR merging, some stacking and the occasional cloning/content-aware fill. All of these can be, with varying degrees of difficulty, accomplished with other software and have been around since CS3 or so. No real need for me to be forking over $10 a month for 5-7 year old features.
There's also the whole “if you do everything the same way the rest of the wold does you'll never learn anything” idea. Practically every serious photographer on the planet uses Lightroom. It's fine software and does a lot of things very well. If it ran on Linux I would have it installed (hint hint Adobe). But to me that means your photos are just going to end up with that “Lightroom look” to them. If you shoot RAW your choice of RAW processor matters a lot. Adobe Camera RAW is very versatile but at the same time it can be somewhat limiting and definitely imparts its look on a finished photo. It's the same reasoning why some photographers choose to use PhaseOne. It just produces a different look.
Every once in a while I just want to try something different with my post processing too. See what else is out there and how it stacks up and what I can accomplish. I picked this time to try this out is because this is a slow time of the year for me. If I was in full shoot/edit mode I wouldn't have the time to sit down and learn new software. It has been a journey, that's for sure. There aren't a lot of photographers going this route and aren't as many resources available to those tho choose to go this way. You'll really need to know how post processing works, what tools do what and be able to figure out problems on your own.
I'm writing this from the perspective of a very experienced Linux user. This isn't a how to dual boot your PC or why should you run Linux series. I'm not going to explain what options on ls do what or how to fix your grub configuration. I've been a Linux, BSD and other *nix user for a very very long time and have accumulated a lot of background knowledge that has come in handy for this process and will not be going into detail with that here. You should be comfortable with the OS already before getting into these posts. With that I'm sure I just lost about 90% of the people reading this.
I'm breaking this down into a few bite-size chunks. The next post will deal with color management, afterwards I'll deal with organizing, keywording, metadata, etc. Finally we'll get into RAW development, importing Lightroom edits and more complex editing. I'm also going to stress that this is an experiment. I still have a MacBook Pro loaded with the usual Adobe branded suspects. I will continue to keep Apple laptops. I may end up back on a Mac desktop in the future. I'm still ducking out to Lightroom and keeping it's library up-to-date with my photos. This is not a finished processes and may never be. It should really just be viewed as another set of tools in your box. I'm offering this as more of an interest piece than an advocacy piece, what works for me might not work for you, YMMV, yadda, yadda. Don't go around telling your friends some guy on the internet said Linux is the best for photography and they're a tool for using what they do, cause that's not what this is about.
In the end it's about making great photos and you should stress about the process as much as most of us do. Just use whatever works for you.
NRO Launch Patches
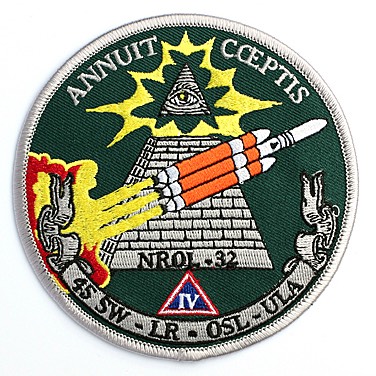
Yesterday I stumbled on a Reddit post about the launch attempt out of Vandenberg AFB. The payload belongs to the National Reconnaissance Office which is a pretty secretive place, the launch patch can be viewed below.
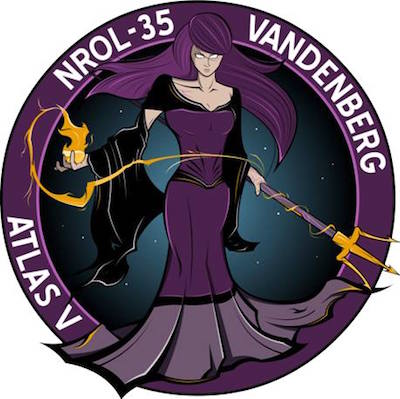
Somewhat mysterious and not as elaborate as other NASA patches. It could be a clue to the payload but given the history of the patches I'm going with "hey guys, let's give the graphics people a fun project and screw with some conspiracy theorists." It seems to have worked given the amount of time devoted on various blogs and boards to deciphering their meaning. Speaking of historical patches here are a few that stuck out to me:
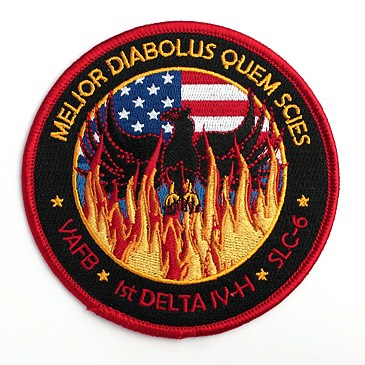
The Latin reads "better the devil you know."
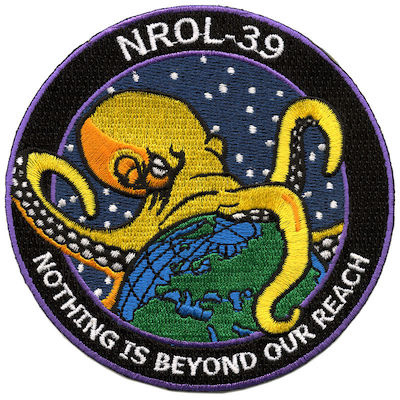
NROL 39 - Space Cthulhu
House, 30 and Growing Up (sort of)
A little over a month ago I turned 30, earlier this year we bought a house and I've recently started looking at strange things called "retirement" and "life insurance" instead of NewEgg, car parts or camera stuff. I don't get it either. There's something terrifying about realizing I could work in my current job until I'm too old to do anything else. That is the stuff of nightmares.
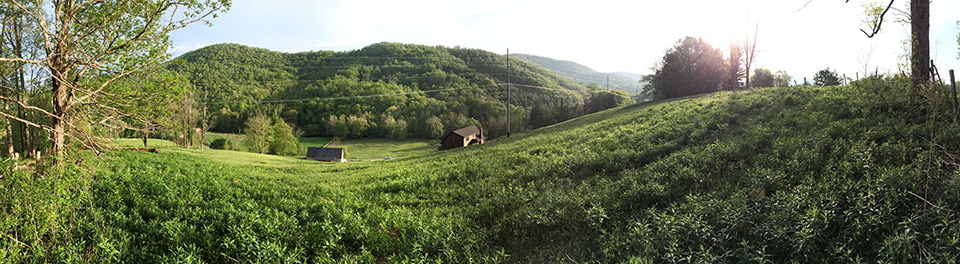
First off the house. We bought a nice place that's kind of out in the middle of nowhere. I've gone from maybe putting gas in my car once a month to doing about 175 miles a week of commuting. The garage is awesome and the house itself is huge. Our Realtor thought we should look at something smaller as this place is really setup for a 4+ person family. But we were largely tired of being cooped up in our ~700-800 square foot apartment and being right on top of each other all the time. Megan and I didn't even have separate office spaces and for those of you who know how I am about my desk can see how that was less than ideal.
The irony of the whole thing is that we mainly bought the place because of the huge bonus room upstairs and we almost never go up there. Seriously, a hobo could be living in it right now and we'd never know it. The first floor is much bigger than we thought so we generally stay downstairs.
I'm still not entirely sure on this whole provincial living thing. It's quiet but the connectivity is awful and I miss being able to walk to work. However there are no loud parties, drunk kids in the front yard, drive by paintings of the neighborhood, sketchy magazine sales people trying to scam you, other seemingly sketchy folks banging on the door asking for rides (we lived less than 30 feet from a bus stop), etc. All of those things actually happened by the way. At my core I think I'm a town or city dweller. I grew up in the countryside and to be perfectly honest I don't have terribly romantic feelings about it. I do miss curbside trash pickup, cell phone service and actual broadband. This DSL is what I call "for humor purposes only." We had to get an actual land line telephone too. However Megan is exceedingly happy out here so I'm content for now. I love having the space to spread out and work on projects too.
I do rather enjoy the garage as well. So much so I've nearly filled up. I recently picked up a used and abused Forester XT for a nice price that I've been working on. It needed a lot of work. New brakes, timing belt and associated hardware, plugs, and exhaust for starters. Still working on the exhaust as both catalytic converters are shot and expensive to replace if I want to stay with stock parts. I may just end up going the after market route. All this has lead me to become even more familiar with turbocharged horizontally opposed engines. That just makes it easier to work on an old Porsche at some point. I've also discovered I really enjoy heated seats, something I though absurdly frivolous before.
A lot has changed in the last few months and I've taken things with different degrees of grace or insanity. At this point I'd say 2/3rds of my coworkers can't stand to be around me. I don't fit in with adults very well. I've also been working on a few new things on the side that don't seem to be going anywhere fast at the moment, more on that later.
Astrophotography Primer Part 2: Gear
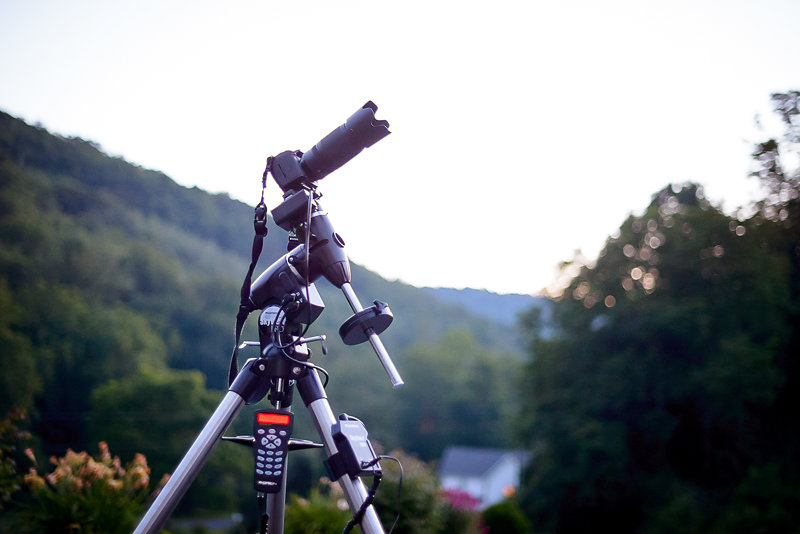
In this installment I'm going to go over some of the gear I use in the field, what it does and how I set it up. Please note: don't feel like you need to run out and buy all of what I have listed in this post! It gets expensive, fast. In reality all you need to get started is some sort of camera with manual controls and a decent tripod. I'm also only going to really go over the basics. Once you get deeper into astro work you'll probably want to add things like an auto-guider and acquisition laptop to the mix.
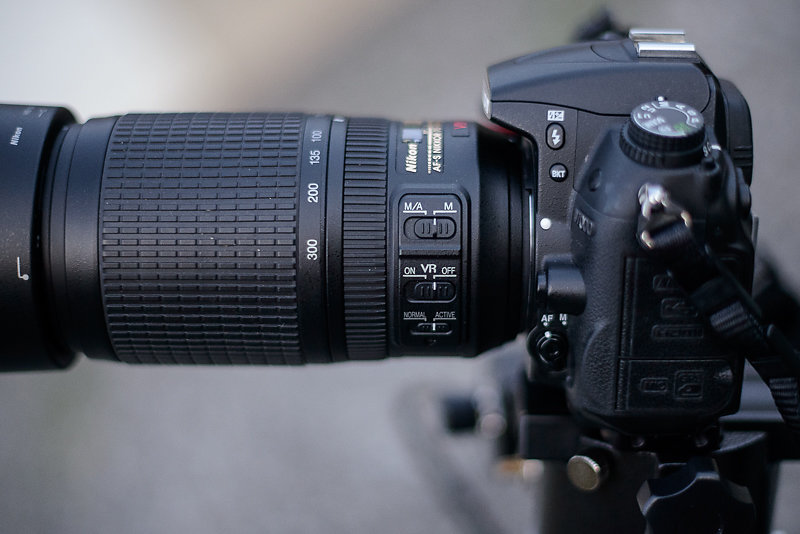
First things first, you do need a camera with manual controls. Shooting at night will severely confuse whatever metering system your camera has. Something with a tripod socket as well. Beyond that anything is fair game. APS-C, full frame, m4/3s, etc are all fine. It just depends on what type of imaging you want to do. Generally full frame is better for wide field while the smaller sensors do better with small telescopic objects. Personally I have both APS-C and full frame, eventually I'd like to add a few smaller sensors to the mix too.
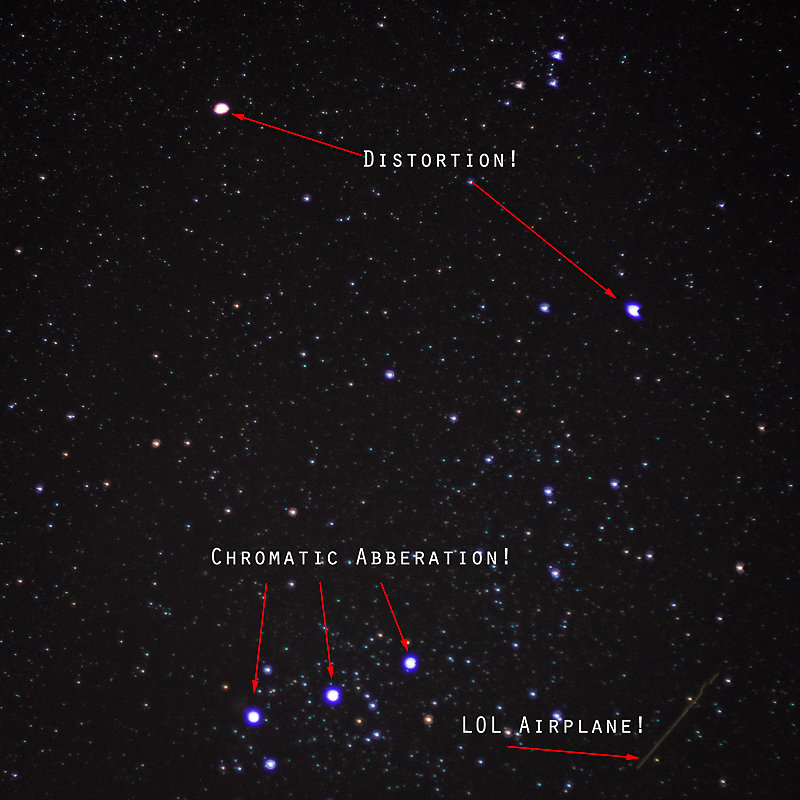
If you're using some sort of camera with interchangeable lenses you'll need some glass to put on that mount. Most people assume that fast lenses are the best for astrophotography and run out, buy ultra-fast primes and shoot them wide open. That's all well and good for terrestrial subjects however stellar objects are a different story. You see, photographing bright points of light on a nearly perfectly black backdrop is a pretty hard task for any lens. Prime lenses are generally especially bad with distortion, chromatic aberration and field curvature when used at their widest aperture. There are a few exceptions, but by and large you're better off closing down a stop or two. This will help alleviate some of the nasty distortions and color fringing. I'm not saying prime lenses are no good for astro work, I use them all the time, just be aware that shooting your 50mm at f/1.4 won't give you good results. Below is an example of what kind of distortion you'll get out of a wide open fast prime. More than likely you'll need to manually focus your lens as well. Most modern lenses do not have a hard focus stop at infinity and the ones that do are sometimes a little off. I usually use Live View on my camera zoomed in on a star and focus the camera that way. You'll want to make the stars as pinpoint as possible and sometimes that'll be harder than others.
If you're using a longer lens (I usually notice it at 300mm at up) you'll probably see the stars sort of shaking on the screen as currents in the atmosphere move around. This is called seeing by astronomers. During a night with good seeing the stars will appear as pinpoints. Conversely on a night with bad seeing the stars will appear as smeared out disks and sometimes the turbulence in the atmosphere will cause them to shake in the view. The longer the focal length of the telescope or lens the more intensified the effects are. Sometimes on nights you can't really use a larger scope you can get away with some imaging at middle to wide focal lengths just fine.
Just doing star trails? Go pick up a solid tripod and ballhead. I like Induro as they seem to have the bang for buck ratio down. A wobbly $20 Wal-Mart wonder isn't going to work.
This brings us to tracking the night sky. Well, rather you'll be counteracting the motion of the Earth. There are a few options here. For the casual astrophotographer or someone looking for a lightweight solution for travel I like the iOptron SkyTracker. It's fairly inexpensive, small and comes with a polar alignment scope. The one limitation is its weight capacity. You're not going to be loading it down with a large lens or telescope. I've heard of folks using a DSLR and 70-200mm zoom with it before but I'd wager that's pushing it. Vixen makes a similar mount called the Polarie and I have a passing familiarity with it as well. As with most things the time spent in preparing is way more important than anything else, this includes aligning the mount. Most polar alignment scopes come with markings for aligning with different constellations in different times of the year. If your alignment isn't spot on you'll get some drift during exposures. It takes practice and some time so plan about 30 extra minutes or more for your first few outings.
For more serious astrophotographers, mainly those who want to use a big lens or a telescope, I recommend picking up some sort of equatorial mount. I own an Orion SkyView Pro GoTo and it will hold up to about an 8" Schmidt-Cassegrain, camera and supporting equipment. I generally like Orion's stuff, but Celestron makes decent mounts too. You can buy a equatorially mounted telescope and use the mount for general wide field work as most equatorial mounts use a dovetail mount that is fairly universal. I'd stay away from driven fork mounts or alt-az mounts as those suffer from field rotation during longer exposures. They're fine for visual use though. As with most things it seems most manufacturers overstate the load capacity of their equatorial platforms. As a safety measure I wouldn't try to load a mount with more than about 75% of it's rated capacity and that I feel is generous, 50% is probably a better number to work with. Loading it to 100% more than likely won't send it crashing to the ground but a strained mount isn't a very sturdy mounting. You'll end up with a lot of bad shots and trailing due to slipping and the motors struggling to keep up. Keep in mind these things are big, heavy and take a long time to setup or take down. You aren't going to be backpacking with most of these mounts. Get a smaller iOptron or Vixen for that.
Next up we'll talk about post processing.
Apollo 11 at 45
Today marks the 45th anniversary of the Apollo 11 moon landing. In a time when our entire civilization was held hostage by two superpowers and our own nation was struggling with massive internal strife we did the impossible. Even in our most tumultuous times humans are capable of greatness. The irony in the whole thing is we used much of the very same technology that threatened our extinction in accomplishing the Apollo program. Proof that our ingenuity is often a double edged sword. Today we face other challenges created by our own cleverness. Hopefully we will use our time and energy wisely to overcome those problems.
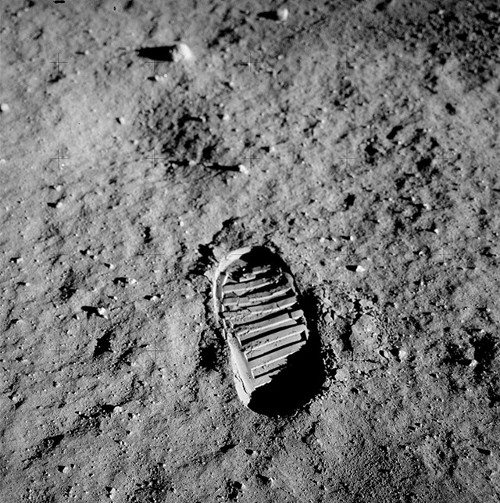
Buzz Aldrin's boot print on the moon
In a few thousand years, long after the people talk about the Americans as we talk about the Romans, ancient Chinese dynasties or the Aztecs today, history books will talk about our civilization's legacy and those who did great things. The great men and women of our time will largely be a footnote. I'd wager that few would remember the Clintons, Bushs, Roosevelts, Kennedys, Lincolns or Obamas. Just as most people today can't name probably more than a few Roman emperors, senators or Chinese dynasties. However three names will be probably come to mind when their history books talk of the Americans: Armstrong, Aldrin and Collins. The photo of a single boot print on another world presented in the same chapter. A reminder of a time when we first escaped the bounds of our planetary cradle and started to take our place as explorers of the cosmos. Perhaps their history books will have other tales of similar experiences on other worlds by other humans. One can imagine.
I'll leave you with a video by Mr Reid Gower who has rehashed some of the words of Carl Sagan. I wasn't alive during the Apollo program so the video and descriptions of those who were is all I have to go on. However I think this video describes the experience well.